Friday, January 27, 2012

Making Soup...and More Pretending

When my daughter was younger, I remember really looking forward to the day where she could pretend with me.  When I was working as a teacher, I was the teacher who would pass out strips of paper and say, "Let's figure out what it could be, what we could do with it!".  Sure, I got a lot of eye rolls, but I also got a lot of creative thinkers.  The art of pretending is really a skill that comes with age, and I would say that age for Olive was about 17 months.  Around that time was when she really started playing "pretend":  pouring tea for her dollies, eating imaginary food with a fork, driving a cardboard car, and more.

I love, love, love pretending with Olive for a lot of reasons, but 2 main reasons really:  1) When you pretend, you can go anywhere, be anyone, and do anything and 2) it doesn't cost anything.  Let's face it, if necessity is the mother of invention, than an empty wallet is the mother of pretend play.

One of Olive's favorite pretend things to do (and by favorite, I mean that it's an activity that she can focus on for more than 15 minutes) is "making soup".


Sprinkling some "spice" into her soup bowl.


Opening a pill box to retrieve some "ingredients" to add to the soup.


Of course, every good cook always tastes their food.


Making soup isn't the only way we pretend around our house.  Here are some other things we have that we pretend with:


  • Old corded telephone
  • Calculator
  • Table setting (place mat, plate, utensils, napkin, cup)
  • Dolls
  • Toy cars
  • Random plastic pieces
  • Scarves & hats
  • Teapot & teacups
Here's a short article I came across on the importance of play that I thought you might enjoy reading.

Olive and I hope you have a fun weekend filled with dancing like a bear, baking cookies in a shoebox, and having a phone conversation with a stuffed animal. :)

Wednesday, January 25, 2012

Healthy Dinner Idea: Vietnamese Pho

If you've never had pho before, your taste buds are in for a flavor party!  Pho (pronounced "fuh") is the national soup of Vietnam and, while it can be made in a variety of ways, typically includes noodles, herbs, and some type of protein.  My husband used to go to pho restaurants all the time and although I love the soup, I actually have never been to a pho restaurant.  All my pho experiences have been with my own homemade version, which I've adapted from a recipe in the magazine Vegetarian Times.  This recipe is so flavorful, even my daughter loves it.  I modify it a little for her, chopping up the chicken and noodles and using less broth.  I give her a spoon and a straw (to slurp up the broth) and she goes to town!  Here is the recipe for your tasting pleasure!

Yes, there are a lot of ingredients.  Get ready:

Broth:
3 large shallots (1 cup), sliced
1/2 cup dried shiitake mushrooms, coarsely chopped
10 cloves garlic, peeled and crushed
3 tbsp low-sodium soy sauce
1 tbsp rice wine vinegar
fresh ginger, sliced into 12 1/4-inch-thick coins
1 tbsp brown sugar
1 tsp ground black pepper
2 cinnamon sticks
2 star anise
5-6 fresh basil stems
5-6 fresh cilantro stems
6 cups low-sodium vegetable broth

Pho:
10 oz. package udon noodles (or rice noodles)
1 pound boneless/skinless chicken breast (or 1 pkg. Asian-flavor baked tofu, thinly sliced) - not pictured
2 cups soybean sprouts
4 green onions, sliced (1/4 cup)
1/2 cup chopped cilantro leaves
1 cup fresh basil leaves, chopped
2 cups watercress (I hate this, but many people like it.  You will not see it here, but feel free to use it!)
2 limes, cut into wedges


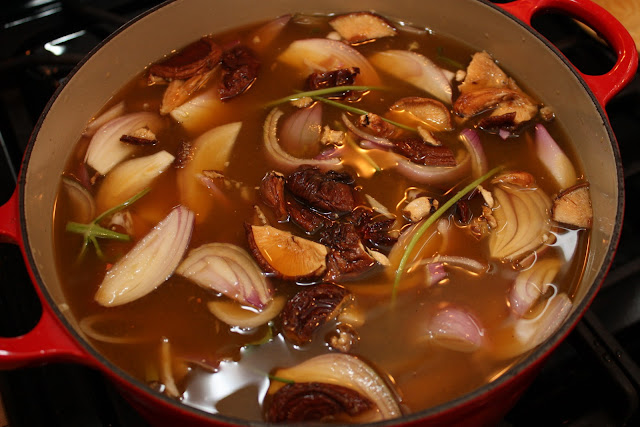
1) To make the broth:  Add all the broth ingredients, shallots through cilantro stems, into a large pot.  Don't worry about how pretty you chop things up - it's going to get tossed later anyways.


2) Add 6 cups vegetable broth and 8 cups water to the pot.  Cover and bring to a boil.  When it begins to boil, reduce the heat to medium-low and simmer, covered, for 1 hour.


3) While the broth is cooking, prepare the chicken.  Slice as thinly as possible into bite-sized pieces.  If your chicken is frozen, it's even easier to cut into thin slices.  Cover and place in the fridge until it's time to use.  If you are using tofu instead, read on to find out what to do.


4)  Cook the noodles according to the package.  These are udon noodles (I prefer these over rice noodles) which require you to cook in boiling water for about 5 minutes.  After they are cooked, rinse under cold water and set aside.  I'm not sure about how to cook the rice noodles, so make sure you read the package.


5)  After the broth has simmered for 1 hour, strain and discard the solids.  I placed a colander over a large bowl and poured.  You aren't going to use any of this stuff, so just throw it away (you were only using it to extract the flavors).  Put the broth back in the pot.


7)  If you are using tofu, skip this step and go to step 8.  If you are using chicken, read on.  Bring the strained broth back to a boil and add the raw chicken.  If you sliced it thinly, it should cook in about 4-5 minutes.  In fact, it will probably start to turn white as soon as it enters the broth.  When it is fully cooked, remove the chicken from the broth and set aside.


8)  Assemble your soup ingredients:  sprouts, chopped basil, cilantro, and green onions, cooked noodles, lime wedges, and cooked chicken (not pictured).  If you are using tofu, slice and place in a bowl as well.


9)  Assemble your pho:  In a large bowl, place noodles in the bottom of the bowl.  Ladle broth over the noodles and top with chicken/tofu, sprouts, green onions, basil, cilantro, and squeezed lime on top.  Of course, feel free to use as little or as much of each of these "toppers" as you like.  It's all up to you on how you want it to turn out.


This is a very slurpy soup, so grab a fork and a spoon (or a pair of chopsticks) and a big napkin.  And if your family members don't like the slurpy sounds of a happy pho eater, get them some earplugs, too.

I hope you enjoy this soup as much as I do and that you have a "pho"ntastic day!  :)

Saturday, January 21, 2012

Busy Boxes...Or Whatever You Want to Call Them!

Busy boxes.  Quiet time bins.  What do I do now? containers.  Whatever you want to call them, they all serve the same purpose.  I initially came across this idea at The View from 5'5" and I was in love at first sight!  The original idea is that these boxes will serve as "quiet" activities for the littles during times of the day where quiet is needed:  during a naptime that is transitioning into awake time, during the time before nap, during the time before bed, etc.  However, I am using it for a different purpose.

My daughter is 20 months old and always looking for something new to do.  Frankly, I often run out of ideas.  I mean, I can only color, play with HotWheels cars, roll on the rug, and make her dollies dance for so long.  I came across the quiet time bins idea and thought, "Bingo!".   When I can't think of something to do, I will just go to her Busy Box of the day and pick an activity to do!  Initially, I tried to incorporate 5 categories into each box:  Practical Life, Learning, Fine Motor, Creative Play, Problem Solving.  As I put the boxes together, it was taking me forever to decide on all 5 categories for each box so I figured, hey, I'll just put at least 4 categories in each box!  For reference, the majority of materials I had on hand at home.  If I didn't have something I wanted, I purchased it from The Dollar Tree.  In the end, I probably spent about $12 to create these boxes (I purchased the actual bins from The Dollar Tree, too!).  Also, I came up with some ideas on my own and some ideas were gathered elsewhere.  If I got the idea from someone else, I've provided a link, so just click on it!  So, without further adieu.....

I have a bin for each day, Monday through Friday.  If I am ever at a lull point in the day, I will reach for that day's bin and pick an activity to do.  By the way, I keep these bins out of my daughter's play area.


MONDAY'S BIN:
2 washcloths for folding practice, first words flashcards, stamps & stamp pads, a puzzle, Coke bottle game (she won't get it, but it will be good for fine motor practice).

TUESDAY'S BIN:
Color matching felt squares (she has colored blocks that we can organize according to color), spaghetti noodles in a cheese shaker jar (for fine motor skill practice), hot glue crayon rubbing plates,  table setting (cup, fork, spoon, napkin, plate, place mat)


WEDNESDAY'S BIN:
Tinfoil (just for creative fun), hygiene kit (brush, loofah, toothpaste - hot glued shut, toothbrush) for practical life play, shape flashcards, puzzle, clothespins (for fine motor - to pin on edge of Tupperware container)


THURSDAY'S BIN:
Peg board strip & golf tees (fine motor), felt shape pieces, child safe scissors (only cut paper) with a magazine (to practice cutting), Etch-A-Sketch


FRIDAY'S BIN:
Color flashcards, mini containers of playdoh, flowers for flower vase arranging, pom poms with a spoon (transferring from one bin to another for fine motor practice)


After a month, I plan on switching out some of the activities to add some newness/variety.  I haven't yet used these with Olive, but I think she will like it.  Given that she only gets to see each activity once a week, I think that it will help to keep her attention longer than a normal everyday activity might.

Wednesday, January 18, 2012

DIY Magnets

I have a metal dry erase/magnetic board (leftover from my previous life as a teacher) that I have for Olive to play with.  However, she's never really played with it because I haven't been able to find any magnets that I'm comfortable with her using.  She still (at 20 months) puts everything in her mouth and I'm paranoid that she'll end up swallowing a small magnet.  So I came up with a solution - make my own choking-hazard-free magnets!

What you need:
- Mod Podge
- Clear Acrylic Spray Sealant
- Magnetic Photo Paper (I got mine at Amazon) - this magnet paper is made to go through your printer, too - cool, huh?
- Already read magazines

How to:
1) Go through your magazines and cut out pictures you think might be of interest to your little one.  If you're like me and don't get a lot of magazine subscriptions, ask around.  Family members, coworkers, and friends will probably be willing to give you their magazines when they're done.  I got my pictures from Parenting, Westways (AAA), Country, Cooking Light, US Weekly, etc.
2) Using the Mod Podge, glue the pictures onto the magnetic paper and then paint over with another layer of Mod Podge.  Let dry overnight.
3) Spray with clear acrylic sealant and let dry overnight.


4) Cut out your pictures and you're ready to go!


If it's easier for you, you can skip the Mod Podge and acrylic sealant and just cover the pictures with clear contact paper.  My daughter's a "picker" and would have picked the contact paper off in minutes, so that's why I went the route I did.

Here she is sticking the magnets on.  I really like the magnet paper because it is lightweight and easy to get on and off the board for her (unlike some heavy duty magnets that start to stick when you're still inches from the board!).


 I think she likes it!


As I gather more magazines, I'll continue to make her new magnets little by little.   I'm also planning on taking pictures of our family members and turning them into magnets, which I know she'll love.   I really like this because they are personal, unique, and don't have any small magnets that she could swallow or choke on.  Yes, she could still rip one apart and eat it if she really tried to, but it would take her a while and I am always near her when she's playing with them as I am with any other toy that could be a potential choking hazard.

Have fun creating your own unique magnets!


Friday, January 6, 2012

The Gift that Keeps on Giving - A Year of Dates!

Okay, just to start, I realize that this post doesn't really fit my blog as it doesn't have much to do with my daughter.  However, it has to do with me and her dad, and without us, well, she wouldn't be here!  I'm just really excited about this idea and wanted to share!

I came across this idea a few months ago on Pinterest, but since then I've seen tons of people doing it on all kinds of blogs.  So I can't really give credit to anyone!  I gave this gift to my husband for this past Christmas.  I think that it would also make a great birthday or anniversary gift.  You could even do it as a wedding gift to someone, which I think would be pretty awesome.  So what is it?


In the box are 12 sealed envelopes.  Inside each envelope is a note card that describes a date that I have planned for me and my husband.  In most cases, I put the amount of cash that we would need for the date or a gift card.  On the first of each month, my husband and I will open that month's envelope together and he will get to see the date I planned.  Then, we'll pick a day that month to go on the date and actually do it!  My mom has volunteered to babysit Olive in exchange for us washing her car once a month! :)


Obviously, since the dates are a surprise for my husband I can't post what I planned just yet.  But as we do each monthly date, I'll create a post about it.  Also, we aren't exactly growing any money trees in my backyard, so I had to do this as cheaply as possible.  The whole 12 months of dates came out to about $120 total.  That's an average of $10 per date!  I tried to come up with dates that were: 1) creative/unique, 2) something we haven't done before (or don't get to do often), and 3) something we can't typically do with our daughter.   I'm really happy with the dates I came up with and I can't wait for my husband to be surprised each month!

Stay tuned in the months to come for updates on each of our dates....I'll have links to the posts below! ;)

January
February
March
April
May
June
July
August
September
October
November
December

Tuesday, January 3, 2012

Sticker Fun

My daughter loves to peel the stickers off and stick them onto all kinds of surfaces, but mostly paper and herself.  A few months ago, I tried the whole sticker thing with her and she would just end up getting really frustrated when she couldn't get the sticker back off from where she stuck it.  Now that she's a little older, she understands it more but she also has learned what surfaces are better if she wants to get the sticker off (her shirt, her nose, a smooth surface play table, the carpet, etc.).

Stickers are great because you can buy them everywhere and they come in an infinite number of pictures, colors, styles, even textures and scents if you want to get really fancy.  I've been buying my stickers recently from my local creative reuse depot.  They sell mixed up sheets of stickers for $0.05 a sheet.  I can get a huge variety for a very small price.  Another good sticker option are those free address labels companies send you in the mail (yes, I know they expect you to donate to them, but I can't let the stickers go to waste, now can I?).

Peeling the stickers - something that took time to learn how to do.
A nose - a perfect place for a sticker!
"I think I'll put this right on my shirt...perfect!"
"Which sticker should I choose next?"